Saturday, August 24, 2013

How does OpenAM work with Windows Desktop SSO ?

How does OpenAM work with Windows Desktop SSO ?

Or Kerberos Desktop SSO with OpenAM and Active Directory.
Or OpenAM and Windows Desktop SSO .
Or Using the windows desktop Single sign on with Openam.

Or OpenAM Windows Desktop SSO Authentication

On your openam IDP instance login and go to

Access control > realm (root or whichever realm you are using) >Authentication >

(Here I am showing you how to get windows desktop sso and in case it doesn’t work for some reason it will fall back to web login where  openam login screen will still allow you to login with user id password) If you just want windows desktop  sso this solution will still work just don’t use “ldapService” module in authentication chain  below.
1. You can create another module for Active Directory service as shown below and let’s call it as “DataStore”. (Here we assume you have already configured active directory)


2. Create new module instance of type windows desktop sso


Now click on your windowsDesktopSSO module instance and configure with your keytab files. (How to generate keytab files is a separate topic. Here I am assuming you have some knowledge of it already)


Now still on the same page Access control > realm (root or whichever realm you are using) >Authentication  
Go to “Authentication Chaining” section.
Create new authentication chaining called “WinDesktopSSOAuthChain”
Add windowsDesktopSSO module as primary module and for fall back add “DataStore” module which will use Active directory in case desktop sso fails. (If you don’t want  exclude Datastore module here)


Also we can create another authentication chain called “ldapservice” which will use you Active Directory (ie. Use the Data store module we created above)


So now when you are at Authentication tab you will see 
Two  module instances (DataStore, windowsDesktopSSO)
Two Authentication Chaining  items(WinDesktopSSOAuthChain and ldapservice)
All we now need to tell openam is what “authentication chain” to use for aunthentication.
For
Organization Authentication Configuration:==> WinDesktopSSOAuthChain
Administrator Authentication Configuration:===> ldapService


By doing this we are telling openam to use “ldapservice”  for Admin authentication and “winDesktopSSOAuth” chain for user’s verification.

Some more links that may be helpful

Once the above settings are done we still need to tweak the browser settings so that browser can send kerberos token.

Configuring the browser for SSO with OpenAM
or configuring Internet explorer for sso with OpenAm
or configuring Firefox for sso with OpenAm
or configuring Chrome for sso with OpenAm

Let’s assume the OpenAM idp url that you are using is http://idp.abc.com.

The OpenAM IDP returns a “401” authorization error to the browser. Each browser responds differently to this 401. What we want is for the browser to attempt authorization with the Kerberos data.
Internet Explorer

By default IE will automatically send your logged-on Windows credentials only to Intranet web sites. The OpenAM IDP can be manually added to the trusted list of Intranet sites until we can engage systems engineering to set it up as a web site that can be automatically recognized as Intranet (and therefore trusted).
1.       Check the User Authentication settings:  Click Tools – Internet Options – Security – Local Intranet. Click the “Custom Level” button, and scroll to the User Authentication section. 


1.       Add the IDP to the list of trusted intranet sites. Click Tools – Options – Local Intranet. Click the “Sites” button, and then click the “Advanced” button.


s
You may also do this via a manual registry update as shown below:
[HKEY_CURRENT_USER\Software\Microsoft\Windows\CurrentVersion\Internet Settings\ZoneMap\EscDomains\abc.com\idp]
"http"=dword:00000001


   Confirm Windows Integrated Security. Click Tools – Options – Advanced. Scroll down to the security section and ensure “Enable Integrated Windows Authentication” is checked. 


d  You are done with IE settings.

Configuring Chrome for sso with OpenAm
Chrome uses the same internet settings as IE, so once IE works, Chrome works too. To confirm this, click Settings, then type network into the search box. Click the “Change Proxy Settings” button. You should see the same Internet Explorer dialog.

Configuring FireFox for sso with OpenAm
When Firefox gets the 401, it can be configured to fall back to a negotiated authentication protocol that achieves SSO. Firefox must be 
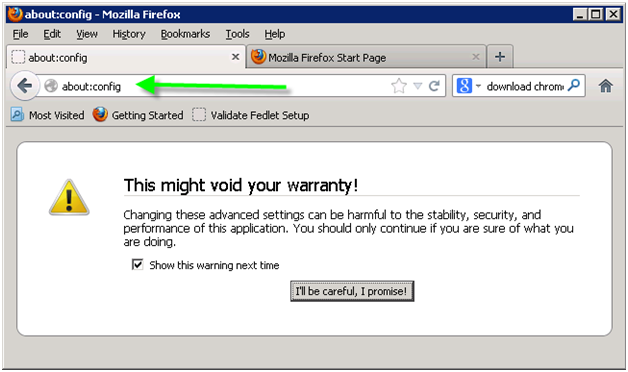
configured to trust the OpenAM IDP for this negotiation to be successful. Launch Firefox, and in the address bar, type about:config


Click the “I’ll be careful” button. In the Search box, type network.negotiate to filter the configurations to only the network negotiation options. Change two values. Both values will be the same. Use the appropriate IDP for the environment you want to test in.
(1)    network.negotiate-auth.delegation-uris
(2)    network.negotiate-auth.trusted-uris

Note: If you have more than one URL that you need to add you can add a COMA SEPARATED LIST in firefox. (For this example I will consider another idp say idp.xyz.com)


In order to make Firefox send the Kerberos ticket you can also use about:config to set 
network.automatic-ntlm-auth.trusted-uris


With this configuration your windows desktop SSO setup should work.
If you liked this article or have suggestion or correction please post your valuable comments.


Saturday, August 17, 2013

SSL Certificates or SSL Certs


In this article I will answer the following questions.
How to create a SSL cert?
How to obtain SSL cert ?
How do I get my cert signed ?
How  to get a signed cert?
How to install a signed ssl certificate to keystore ?
How to convert jks to pfx ?
what is jks keystore?
what is pfx  keystore?
what is a keystore ?

I was working on some security related project and wanted  to get a signed cert installed.So I did read few articles and the outcome of that is what I have explained below.

Keystore is a file (a database) to store your public/private keys.
Keystore can be in different formats - Most populare ones are JKS, PKCS12.
JKS is a Java-specific file format to store keys in key store. your keystore can be .keystore or abc.jks or any other name.

.p12 or .pfx for type "PKCS12" - (Personal Information Exchange)  - Is another format to store public/private keys.PKCS just means Public-Key Cryptography Standards)
The .pfx file extension most often indicates a Personal Information Exchange file, most frequently used on a Windows operating system or .NET framework.


To get a signed cert we need the following

Step1. Generate a Key pair using Keytool
Step2. Generate a CSR (Cert Signing Request) for the Keys you generated in step1.
(Read more for to find what CSR contains http://en.wikipedia.org/wiki/Certificate_signing_request)
Step3: Send the CSR file to CA (Certifying Authority) like Verisign or Digicert or Thwart.
Step4: Import the signed.Once you receive the signed cert from CA which may be a .p7b (PKCS #7 Certificate) it will have 3 certs within it
                - your cert generated in step1 which is signed
                - CA root cert
                - CA intermediate cert

Step5: Now you need to add back the signed cert sent by CA.This process involves updating your keystore with new signed public key. Your private key will still be the same. Since you are adding the signed public key we also need to add CA root cert and CA intermediate cert. I will explain below.


STEP1: Generate a key pair
===========================
keytool -genkeypair -alias testcertforsigning -storepass
secret -keypass secret -validity 1825 -keystore my_java_keystore.jks -keyalg RSA
 -keysize 2048 -storetype JKS -dname "CN=*.xyz.com, OU=Development,
 O=xyz.com, L=Bangalore, S=Karanataka, C=IN"
where   testcertforsigninng - is the cert name
                secret - I used this as both store password and cert password. you can use different strings                       
                validity - 1825 days  - 5 years
                Rest is all obvious which tells what algorithm, key size (use 2048 or higher for better security) and what your company name is.
                CN=*.xyz.com ==> Tells that this cert is applicable for all url’s that end with *.xyz.com assuming in your company you have url’s like app1.xyz.com, app2.xyz.com, app3.xyz.com to access your application.

Now if you list the contents of Key store
keytool -list -v -keystore my_java_keystore.jks
-storepass secret

NOTE: If you have both public/private key entry after running key tool you will see
Your key store contains 2 entries

Alias name: testcertforsigning
Creation date: Apr 18, 2013
Entry type: keyEntry
Certificate chain length: 1 ===>
Certificate[1]:
{The actual cert information will be printed here. Excluded that intentionally.}

The Entry type: keyEntry ==> indicates that you have both public/private key pair else the type:
Certificate chain length: 1 ===> Tells you have one cert (This is cert doesn’t not have root cert and intermediate cert yet so the length is one.)

Step2 and 3: Generate a CSR (Cert Signing Request) for the Keys you generated in step1.
===============================================================================
keytool -certreq -keystore my_java_keystore.jks
-storepass secret -alias testcertforsigning 
-file xyz_cert_signing_req.csr

More info on csr file contents: http://en.wikipedia.org/wiki/Certificate_signing_request
Remember this file will only have your public key and some info about your organization. You never  will or should share private key.
Now send this xyz_cert_signing_req.csr to CA (certifying authority) like verisign or digicert. (Yes you need to pay to get a signed cert :) )


Step4: This is very important step. Here if you try to import just your signed cert you will get error.
Follow these steps:
-          Once you receive your signed cert from CA, let’s call this as xyz_cert_signing_req.p7b.
-          Double click the file and you should see something similar (your  CA name could be different )


Now click on each cert (i.e. *.xyz.com, Digicert High Assurance CA-3, Digicert High Assurance EV Root CA) and a popup launches as shown below and now you should be able to save each cert public key separately, Choose Base-64 encoded X.509 (.CER) format when saving.


 Certificate export Wizard


Let’s call these exported cert’s as
RootCA.cer
HighAssuranceIntermediateCA3.cer
xyz_cert_signing.cer

If you open them in text editor you will see something like

-----BEGIN CERTIFICATE-----
MIIDxTCCAq2gAwIBAgIQAqxcJmoLQJuPC3nyrkYldzANBgkqhkiG9w0BAQUFADBs
…..
….
-----END CERTIFICATE-----

Now combine the three * .cer files in to one file (You can manually copy or use a script)
Let’s call this as xyz_cert_signing_combine.txt
This combined file will have all 3 certs (root,intermediate and your xyz_cert_signing.cer) contents
-----BEGIN CERTIFICATE-----
Contents of RootCA.cer  here
-----END CERTIFICATE-----
-----BEGIN CERTIFICATE-----
Contents of HighAssuranceIntermediateCA3.cer  here
-----END CERTIFICATE-----
-----BEGIN CERTIFICATE-----
Contents of xyz_cert_signing.cer here
-----END CERTIFICATE-----


STEP5:  Now import this signed public key along with its root, intermediate cert too your key store.
So you  need to use the combined file xyz_cert_signing_combine.txt
(I am using keytool which is part of java jdk)
   
keytool -import -trustcacerts -file xyz_cert_signing_combine.txt -keystore my_java_keystore.jks  -alias testcertforsigning  -storepass secret  -keypass secret

 Now if you list your keystore you will see root cert, intermediate cert and your signed public key sitting along with your private key.

If some other app asks your signed public key you can send them xyz_cert_signing_req.p7b  in which case they will extract root cert, intermediate cert and your signed public key. However if they want to install to the keystore , they may have to combine all 3 keys like I explained and install it differently

keytool -import  -file
 xyz_cert_signing_combine.txt
  -keystore my_java_keystore.jks  -alias testcertforsigning  -storepass secret  

(NOTE: The keypass and –trustcacerts is not required as we are not updating existing public-private key instead just adding a public key. It makes sense as without the root ca cert and intermediate cert there is no way the other app can trust if your public key is signed by the right authority.)

To convert JKS to PFX
keytool -importkeystore 
 -srckeypass secret –destkeypass meow123 
 -srcstorepass secret -deststorepass meow123 -srcalias testcertforsigning  -destalias testcertforsigning  -srckeystore  my_java_keystore.jks  -destkeystore  not_java_keystore.pfx  -deststoretype PKCS12
If you are adding more than one cert repeat the
-srcalias   -destalias  options more than once.


In case you want to export the public key only

TO LIST KEYSTORE:
=================
--Java Key store
 keytool -list -v -keystore my_java_keystore.jks -storepass secret

--PFX (Personal Information Exchange)  key store.
 keytool -list -v -keystore not_java_keystore.pfx -storepass secret -storetype PKCS12


NOTE: If you have both public/private key entry after running key tool you will see
Your keystore contains 2 entries
Alias name: testcertforsigning
Creation date: Feb 1, 2022
Entry type: PrivateKeyEntry
Certificate chain length: 4
Certificate[1]: {The actual cert information will be printed here. Excluded that intentionally.}


The Entry type: PrivateKeyEntry indicates that you have both public/private key pair hence the type:


Incaser someone sent you ".pfx" file  , In java you can specify the  "pfx" file as keystore and "Jks" file as truststore by importing ".cer" files to  your java keystore.


In java code you can  do this are export the same using -D option.

            Properties props = System.getProperties();
    // to enable debugging 
        props.setProperty("javax.net.debug","all");

 //Mostly will have CA certs 
          props.setProperty("javax.net.ssl.trustStore","C:\\Program Files\\Java\\openjdk-11\\lib\\security\\cacerts");
      props.setProperty("javax.net.ssl.trustStorePassword", "changeit");
          props.setProperty("javax.net.ssl.trustStoreType","PKCS12");
         
          props.setProperty("javax.net.ssl.keyStore", "C:\\Rama\\Project\\RamaFinancialTest2022.pfx");
          props.setProperty("javax.net.ssl.keyStorePassword", "abcd");
          props.setProperty("javax.net.ssl.keyStoreType","PKCS12"); 
 //In case you want to control Ciphersuites based on what the server is supporting
//props.setProperty("jdk.tls.client.cipherSuites","TLS_ECDHE_RSA_WITH_AES_256_GCM_SHA384");
  //props.setProperty("jdk.tls.server.cipherSuites","TLS_ECDHE_RSA_WITH_AES_256_GCM_SHA384");

Though in java its common to use the same "jks" (cacert file mnetioned above) as keystore and trust store. In our case a external client sent the ".pfx" file which any way java can read so we used that as Keystore as it as priavetKeyEntry (public and priavet key chain) and extracted the remaining root and inetermedicate certs and added to trust store. 

More info:

Please read